Installing Windows for the first time can feel intimidating, especially if you’ve never worked with an operating system setup before. The good news is that Windows installation has become much simpler over the years. If you follow each step carefully, you can install Windows on your computer without needing professional help. This guide explains everything in detail, including small things beginners often miss.
What You Need Before Installing Windows
Before starting the installation, make sure you have everything ready. Preparation prevents most installation problems.
First, you need a computer or laptop that meets Windows system requirements. Your device should have a compatible processor, at least 4 GB of RAM (8 GB is recommended), and at least 64 GB of free storage space. If your system is very old, it may not support newer versions of Windows.
Second, you need a stable internet connection. This is required to download the Windows installation files and later to install updates and drivers.
Third, you need a USB flash drive with at least 8 GB of storage. This USB will be used to create a bootable Windows installer. Any existing data on the USB will be erased, so back up important files first.
Finally, back up your personal data if Windows is already installed on the computer. Installing Windows can delete files if you choose the wrong option, so copying documents, photos, and videos to an external drive or cloud storage is strongly recommended.
Step 1: Download the Official Windows Installation Tool
The safest way to install Windows is by using Microsoft’s official installation tool. This tool automatically downloads the latest Windows files and prepares your USB drive.
Visit the official Windows download page using a web browser. Choose the version of Windows you want to install, then download the Media Creation Tool. Once the file is downloaded, double-click it to start the setup.
When the tool opens, accept the license agreement. Select the option that allows you to create installation media for another PC. Make sure the language, edition, and system type (64-bit or 32-bit) match your computer. Most modern systems use 64-bit.
Step 2: Create a Bootable Windows USB Drive

Insert your USB flash drive into the computer. The Media Creation Tool will detect it automatically. Select the USB drive option and continue.
The tool will now download Windows files and copy them to the USB drive. This process may take some time, depending on your internet speed. Do not remove the USB drive during this step.
Once completed, you will see a message confirming that your USB drive is ready. Safely remove the USB from the computer.
Step 3: Prepare Your Computer for Installation
Now move to the computer where Windows will be installed. Insert the bootable USB drive into that system.
Turn off the computer completely. Turn it back on and immediately press the boot menu or BIOS key. Common keys include F2, F12, ESC, DEL, or F10, depending on the manufacturer. If you are unsure, look for a message on the startup screen such as “Press F12 for Boot Menu.”
In the boot menu, select the USB drive as the boot device. This tells the computer to start from the Windows installer instead of the existing operating system.
Step 4: Start the Windows Installation Process

After selecting the USB drive, the Windows setup screen will appear. Choose your language, time, and currency format, and keyboard layout. These settings can be changed later, so do not worry if you make a mistake.
Click “Install Now” to begin. If asked for a product key, you can either enter it now or select “I don’t have a product key” to activate Windows later.
Choose the Windows edition that matches your license. Selecting the wrong edition may cause activation issues later.
Step 5: Choose Installation Type Carefully
You will be asked to select the type of installation. There are two main options.
The Upgrade option keeps existing files, settings, and apps. This is useful if you are reinstalling Windows on a working system.
The Custom option installs Windows from scratch. This is the best choice for a new computer or when fixing serious system problems. Beginners often choose this option without realizing it can delete files, so double-check before continuing.
If you select Custom, you will see a list of storage drives and partitions.
Step 6: Select or Create a Drive Partition
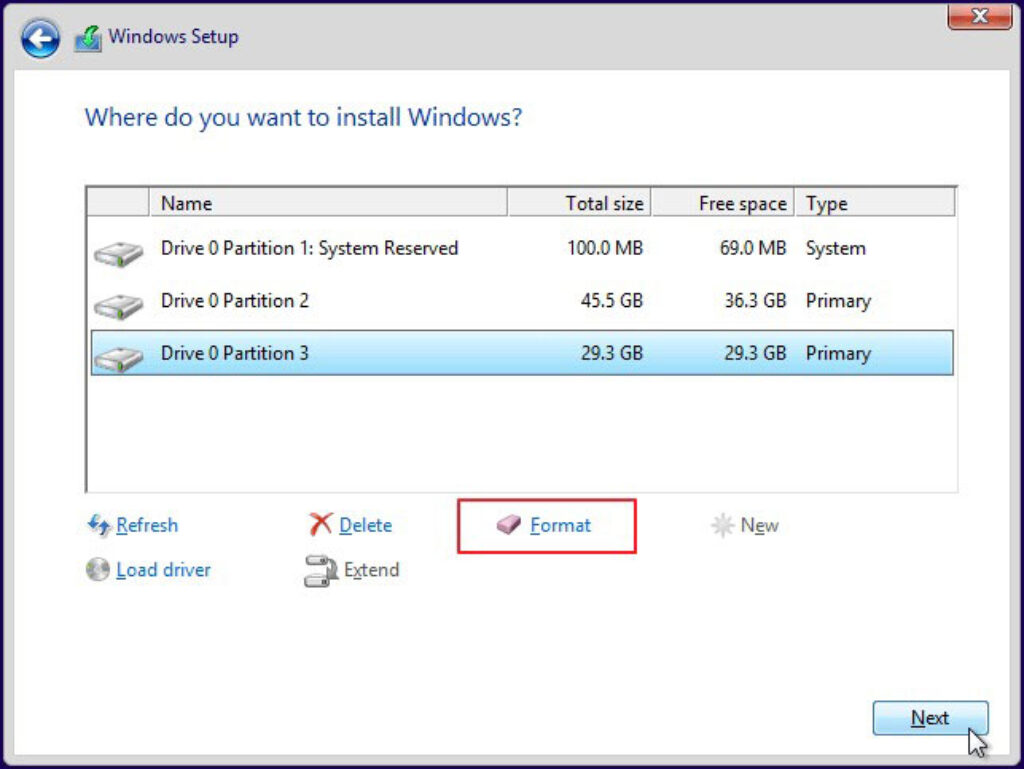
This is one of the most confusing steps for beginners, so take your time.
If you are installing Windows on a new or empty drive, select the unallocated space and click Next. Windows will automatically create the required partitions.
If Windows is already installed and you want a clean install, select the main system partition and choose Format. This will erase all data on that partition. Make sure you have backups before doing this.
Once the correct partition is selected, click Next. Windows will now begin copying files.
Step 7: Let Windows Install and Restart
The installation process will copy files, install features, and apply updates. Your computer will restart several times. This is normal.
Do not remove the USB drive until Windows tells you to do so or until the setup clearly moves to the configuration stage. Removing it too early can interrupt installation.
The entire process usually takes 20 to 45 minutes, depending on system speed.
Step 8: Complete Initial Windows Setup
After installation, Windows will ask you to complete the basic setup. This includes choosing your region, keyboard layout, and network connection.
You will then be asked to sign in with a Microsoft account or create a local account. A Microsoft account is recommended because it enables cloud sync, security features, and easier recovery.
Set a password or PIN when prompted. These protect your system from unauthorized access.
You may also be asked about privacy settings such as location access, diagnostics, and personalized ads. Read each option carefully and choose what you are comfortable with.
Step 9: Install Drivers and Updates
Once you reach the Windows desktop, your installation is almost complete. However, some hardware may not work correctly until drivers are installed.
Connect to the internet and open Windows Update. Check for updates and install everything available. Windows often downloads drivers automatically.
If something like Wi-Fi, sound, or graphics does not work properly, visit the manufacturer’s website and download the correct drivers for your device model.
Step 10: Activate Windows
If Windows is not activated automatically, go to Settings, then Activation. Enter your product key if required.
Activation ensures full access to Windows features and removes watermark messages.
Common Mistakes to Avoid
Many beginners accidentally format the wrong drive. Always double-check the drive size and label before deleting or formatting anything.
Another common mistake is removing the USB drive too early. Wait until Windows finishes copying files and restarts on its own.
Skipping updates can also cause issues. Always install updates after setup to ensure security and stability.
Final Words
Installing Windows may seem complex at first, but when broken down into clear steps, it becomes manageable even for beginners. The key is patience and careful reading at every stage.
If you follow this guide step by step and avoid rushing, you should have a clean and fully working Windows system without unnecessary problems.